Showing posts with label Tkinter. Show all posts

Wednesday, 13 February 2019

Changing Colours

img_a_01

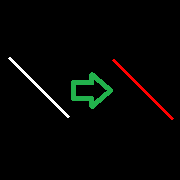
Well, in this opportunity I got some simple animation that involves a straight line that change its colour between 4 options in a fixed order, it's a relatively simple task, although I've seen codes that involve the use of objects and classes, so I hope to get a better understanding on them before posting about it.

Tuesday, 8 August 2017

Mach Number Calculator

img_a_01

Code for the simple Mach Number calculator:

from Tkinter import *

def mc():
    # 1st Function
    try:
        ns00, ns01 = a00.get(), a01.get()
        ns02, ns03 = a02.get(), a03.get()
        V = ns00
        k = ns01
        R = ns02
        T = ns03  

Thursday, 1 December 2016

Canvas - Text

img_a_01

The first code shows how the text is located in the canvas:

from Tkinter import *

root = Tk()

ch, cw = 200, 200
x0, y0 =   0,   0
x1, y1 =  20,  40 

Tuesday, 26 July 2016

Canvas - Drawing Polygons

img_a_01

The first code is a simple example:

import Tkinter
root    =  Tkinter.Tk()
ch, cw  =  170, 170
c1 = Tkinter.Canvas(root, height = ch, width = cw, bg = "black")
ps = [   60, 130,  40, 120,  40,  80,  70,  40,
        100,  40, 130,  80, 130, 120, 110, 130] 

Thursday, 21 July 2016

Canvas - Drawing Arcs

img_01v2
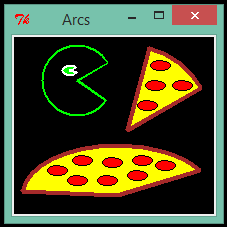
The first code is a simple example:
import Tkinter
root    =  Tkinter.Tk()
ch, cw  =  200, 200
c1 = Tkinter.Canvas(root, height = ch, width = cw, bg = "black")
c1.create_arc(30, 30, 200, 200, start = 30, extent = 45, outline = "brown", 
fill = "yellow", width = 4)

Saturday, 2 July 2016

Canvas - Drawing Ovals

img_a_01

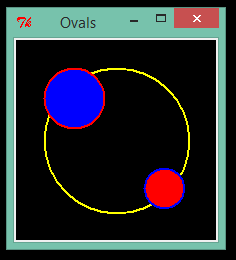
The first code is a simple example:

import Tkinter
root    =  Tkinter.Tk()
ch, cw  =  200, 200
c1 = Tkinter.Canvas(root, height = ch, width = cw, bg = "black")
c1.create_oval(30, 30, 175, 175, outline = "yellow", width = 2) 

Thursday, 10 March 2016

Canvas - Drawing Rectangles

img_16_10_001001001

The first code is a simple example:

from Tkinter import *
root = Tk()
c1 = Canvas(root, height = 180, width = 200, background = "black" )
c1.create_rectangle( 27, 17, 103,  93, fill = "blue", outline = "cyan")
c1.create_rectangle(103, 93, 179, 169, fill = "red", outline = "yellow")
c1.pack()
root.title("Rectangles")
root.mainloop()
 

Thursday, 28 January 2016

Canvas - Drawing Lines


The first code is a simple example:
from Tkinter import *
root = Tk()
c1 = Canvas(root, height = 180, width = 200)
c1.create_line(20, 20, 160, 160, fill = "orange"  , width = 3)
c1.create_line(40, 50, 100, 110, fill = "yellow"  , width = 3)
c1.pack()
root.title("Lines")
root.mainloop()
 
We must create a canvas using the "Canvas" method, also its dimensions are declared here.

Sunday, 29 November 2015

Drop Down Menus


The next code is a simple example of how to make appear menus with Tkinter:

from Tkinter import *
def dns():

Monday, 26 October 2015

Solving 2 Linear equations

img_01

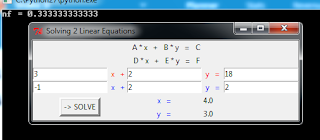
The next code is based on the Gauss Elimination method for solving a system of linear equations.

# Gauss elimination method for 2 linear equations
import Tkinter as tk

def lab_1(txt, foreground, row, col):
    w = tk.Label(root, text = txt, fg = foreground)
    w.grid(row = row, column = col)
    return w  

Monday, 11 May 2015

Cross-multiplication Calculator (The Rule Of Three)

In this post I will put a code tha makes a 'calculator' that uses cross-multiplication (or like the title says, The Rule Of Three).

Well, (Wikipedia link-here) one can cross-multiply to determine the value of a variable.

In this case it's like:

a * x = b * c
Which ends up (for the 'x' variable) in:

 x = c * b / a

Thursday, 7 May 2015

Using tkMessageBox

Now I'm going to use the module "tkMessageBox", which is used to display message boxes, first in a simple code in order to show how it goes, then using it with a previous posted example :P.

The simple code has been a used with one of the functions that "tkMessageBox" provides (for a little bit more of information you can go to the next link : Python Tkinter tkMessageBox;  or this other one for the code of the message box of the first image in this post)

Anyway, this is the simple code (a warning will be shown when the user clicks the button that says "Warning"):

import Tkinter as tk
import tkMessageBox

root = tk.Tk()

def info():
   tkMessageBox.showwarning("Warning", "Resources changed")

tk.Button(root, text = "Pop up", command = info).pack()

root.mainloop()

Saturday, 25 April 2015

Creating a simple Reynolds number calculator

This time I'm posting a simple Reynolds number calculator, it has been done without using the class mechanism because I was getting some wierd results.

The image that is going to be used is the next one:

The code is the next one:

from Tkinter import *

def calc_Re():
    """
    Re : Reynolds Number
         (Adimensional number used to determine
          if a fluid flow is laminar or turbulent type)
    Re = velocity * diameter / kinematic_viscosity
    Re =  v__val  *  d__val  /      nu_val
    (row = 3, column = 1)
    """
    if nu_val.get() == 0:
        print "Kinematic viscosity must be greater than zero"
        lab4.config(text="Nu = 0")

Thursday, 23 April 2015

Cursors in Python Tkinter

Now it's time to use one of the stuff that support Python TKinter: mouse cursor.


The simple way to show how this works is shown with the next code (used in a previous post, with a little modification):

import Tkinter
root = Tkinter.Tk()
button = Tkinter.Button(root, text = "Forgotten Sign", cursor="rtl_logo").pack()
root.mainloop()

img_cursor_test_tk_0101

The next code is a modification of a previous posted code that uses the class mechanism:

from Tkinter import *

def frame(root, side):
    # wf : Window Frame
    wf = Frame(root)
    wf.pack(side=side, expand=YES, fill=BOTH)
    return wf

def button(root, side, text, command=None, cursor=None):
    btn = Button(root, text=text, command=command, cursor=cursor)
    btn.pack(side=side, expand=YES, fill=BOTH)
    return btn

class Sample(Frame):
    def __init__(self):
        Frame.__init__(self)
        self.pack(expand=YES, fill=BOTH)
        self.master.title("Simpl3")
        self.master.iconname("Simpl3")

        opsF = frame(self, TOP)
        btn0 = button(opsF, LEFT, "About time!", cursor="pirate")
        btn1 = button(opsF, LEFT, "Pattern", cursor="rtl_logo")
        btn2 = button(opsF, LEFT, "Preloading...", cursor="watch")

if __name__ == "__main__":
    Sample().mainloop()

img_cursor_test_tk_0202

Well, there has been some troubles at taking shots from the frickin' cursor, this post was with the lonely initial picture, but now that's been fixed :P

The next list mention a few of them:
-arrow
-circle
-clock
-cross
-dotbox
-exchange
-fleur
-hand1
-hand2
-heart
-man
-pirate
-plus
-sailboat
-star
-target
-trek
-watch
-xterm

In the next links you can find a list of cursors:
§ http://infohost.nmt.edu/tcc/help/pubs/tkinter/web/cursors.html

§ http://www.tcl.tk/man/tcl8.4/TkCmd/cursors.htm

Monday, 20 April 2015

Using images with TKinter

Now is time that we use images for our oncoming projects, first I will start with a simple piece of code, but before that you must make sure to save the script in the same folder in which the images are contained (well, at least with the present code), this images are named "8_01.gif", "8_02.gif", "8_03.gif", "8_04.gif", "8_05.gif":


The code is the next one:

from Tkinter import *

root = Tk()

pic_1 = PhotoImage(file = "8_01.gif")
pic_2 = PhotoImage(file = "8_02.gif")
pic_3 = PhotoImage(file = "8_03.gif")
pic_4 = PhotoImage(file = "8_04.gif")
pic_5 = PhotoImage(file = "8_05.gif")

label = Label(root, image = pic_5)
label.pack()

btn1 = Button(root, image = pic_1)
btn1.pack()

btn2 = Button(root, image = pic_2)
btn2.pack()

btn3 = Button(root, image = pic_3)
btn3.pack()

btn4 = Button(root, image = pic_4)
btn4.pack()

root.mainloop()

Tuesday, 14 April 2015

Using Tkinter with a class method

In this post I did a remake of another previous example,


 but in this case I'm using a class method mixed with the previous way of using the "root = Tk()", well in this case this was just a simple way to change the title, which can be seen in the final parts of the code.

from Tkinter import *

class HH_set:

    def __init__(self, master):
        frame = Frame(master)
        frame.pack()

        self.songLabel = Label(frame, text = "Spoon - 'Got Nuffin'. Available this summer!")
        self.songLabel.pack()

        self.xclmLabel = Label(frame, text = "Yeah!")
        self.xclmLabel.pack()

        self.hearButton = Button(frame, text = "Let's hear it", state = DISABLED)
        self.hearButton.pack(side = LEFT)

        self.seeButton = Button(frame, text = "Let's see", state = DISABLED)
        self.seeButton.pack(side = RIGHT)

        self.tuneButton = Button(frame, text = "Tune", command = self.printMessage)
        self.tuneButton.pack(side = RIGHT)

    def printMessage(self):
        print "Channel open"

root = Tk()
root.title("Happy Hour")

base_object = HH_set(root)

root.mainloop()

Monday, 13 April 2015

Using a class to create a button

This time I'm using something that is new for me (at least when I'm writing this post :P), which is the use of a class (along with functions) in order to create a button with TKinter. The result is similar to one of the first examples that I've posted, but the code is more complex.


from Tkinter import *
def frame(root, side):
    # wf : Window Frame
    wf = Frame(root)
    wf.pack(side=side, expand=YES, fill=BOTH)
    return wf

def button(root, side, text, command=None):
    btn = Button(root, text=text, command=command)
    btn.pack(side=side, expand=YES, fill=BOTH)
    return btn

class Sample(Frame):
    def __init__(self):
        Frame.__init__(self)
        self.pack(expand=YES, fill=BOTH)
        self.master.title("Simpl3")
        self.master.iconname("smpl3")

        opsF = frame(self, TOP)
        btn = button(opsF, LEFT, "About time!")

if __name__ == "__main__":
    Sample().mainloop()

Creating a simple square root calculator

With the next code you will be able to use the input from the user an display the result in the created window by clicking a button with an assignated command.

# Calculating x**0.5
from Tkinter import *

def square_calc():
    x = x_val.get()
    sqx = x ** 0.5
    print "x =", x, "\t", x, "** 0.5 =", sqx
    sqx_txt = Label(root, text = "x ** 0.5 =").grid(row=3, column=0)
    sqx_lab = Label(root, text = sqx).grid(row=3, column=1)

root = Tk()
root.title("Calculating square root")

x_val = DoubleVar()

x_lab   = Label(root, text = "x").grid(row=0, column=0)
nmb     = Entry(root, textvariable = x_val).grid(row=0, column=1)
calc    = Button(root, text = "Calculate", command=square_calc).grid(columnspan=2)
y_lab   = Label(root, text = " ").grid(row=3, column=0)

root.mainloop()


The result would be like this:


Using the 'command' option of the Button widget

In this post I will show how to put some buttons and assign a command to one of them, yeah, at last something with functionality :P

Well, first goes the code like this:
from Tkinter import *

def printMessage():
    print "Channel open"

root = Tk()
root.title("Happy hour")
label_1 = Label(root, text = "Spoon - 'Got Nuffin'. Available since this summer!")
label_2 = Label(root, text = "Yeah!")
label_1.pack()
label_2.pack()
Button(root, text = "Let's hear it", state = DISABLED).pack(side = LEFT)
Button(root, text = "Let's see").pack(side = RIGHT)
Button(root, text = "Tune", command = printMessage).pack(side = RIGHT)
root.mainloop()


When running the previous code, you should get something like the next picture:


Wednesday, 25 March 2015

Creating Button

In this code samples it is shown how to create buttons in a simple way, albeit it could get complicated at the end.

The first go like this:

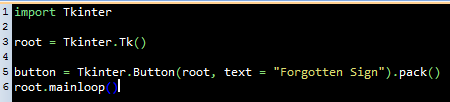
import Tkinter
root = Tkinter.Tk()
button = Tkinter.Button(root, text = "Forgotten Sign").pack()
root.mainloop()


Which ends up like this: